
How to Create an ERC20 Token on Ethereum (no code)

How to Create an ERC20 Token on Ethereum (no code)
Creating an ERC-20 token on the Ethereum blockchain is simpler than you might think. These digital assets follow a standardized set of rules, the ERC-20 standard, which ensures seamless interactions within the Ethereum ecosystem. Whether used as digital currency, representing assets like stocks or commodities, or providing membership in a club, ERC-20 tokens are versatile and powerful.
This guide will take you step by step through the process of creating your own ERC-20 token, covering everything from the fundamentals to blockchain deployment. Get ready to dive in and embark on your journey into the world of Ethereum tokens.
Table of Contents
What is an ERC-20 Token?
ERC20 Token Use Cases
Create an ERC20 Token on CoinDevTools.io
Steps to Connect Your Wallet
Creating Your Token
How to Verify Smart Contract Safety
How to List Your Token on Exchanges
Uniswap and Other DEXs
CoinMarketCap Listing
CoinGecko Listing
Maximizing Visibility
Understanding ERC-20 Token Approvals
How Token Approvals Work
Security Best Practices
What is an ERC-20 Token?
ERC-20, short for Ethereum Request for Comment 20, is a widely adopted technical standard on the Ethereum blockchain. It establishes a consistent set of rules for Ethereum-based tokens, simplifying their development and ensuring seamless integration within the ecosystem.
ERC-20 tokens are digital assets that function like cryptocurrencies such as Bitcoin but run on the Ethereum blockchain, requiring gas fees for transactions. Before the ERC-20 standard, tokens had unique smart contract code, making wallet and exchange integration complex. By establishing a unified framework, ERC-20 streamlines token interactions, allowing for seamless adoption and efficient trading.
ERC20 Token Use Cases
Enterprise businesses leverage ERC-20 tokens for various purposes. Here's how they utilize them in eight key steps:
Tokenizing Assets– Physical assets like real estate or art can be represented as ERC-20 tokens, making them easier to trade and accessible to a wider range of investors.
Enabling Smart Contracts– Built on Ethereum, ERC-20 tokens support smart contracts, automating business processes such as supply chain management and voting systems.
Launching Loyalty & Rewards Programs– Companies use ERC-20 tokens to create loyalty programs, encouraging repeat business and enhancing customer engagement.
Facilitating Fundraising– ERC-20 tokens enable businesses to raise capital through Initial Coin Offerings (ICOs) or Security Token Offerings (STOs).
Reducing Costs & Increasing Efficiency– Transactions with ERC-20 tokens streamline financial operations, cutting administrative costs and improving payment speed.
Developing Decentralized Apps– ERC-20 tokens serve as the backbone for dApps, enabling decentralized exchanges, governance systems, and more.
Enhancing Interoperability– Standardized ERC-20 tokens ensure seamless integration with wallets, exchanges, and other Ethereum-based platforms.
Improving Transparency & Security– Transactions recorded on the blockchain provide businesses with a secure, tamper‑proof ledger, boosting trust and accountability.
Minting an ERC-20 token is relatively straightforward, though it traditionally required some technical expertise and blockchain knowledge. Developers have several options: they can use a token creation platform, write custom smart contracts, or hire a team experienced in tokenization to handle the process.
With the Coin Dev Tools platform, this process has become radically different—making token creation easier and faster to implement. Developers can now launch tokens without deep coding knowledge, streamlining the entire process.
Create an ERC20 Token on CoinDevTools.io
Steps to Connect Your Wallet
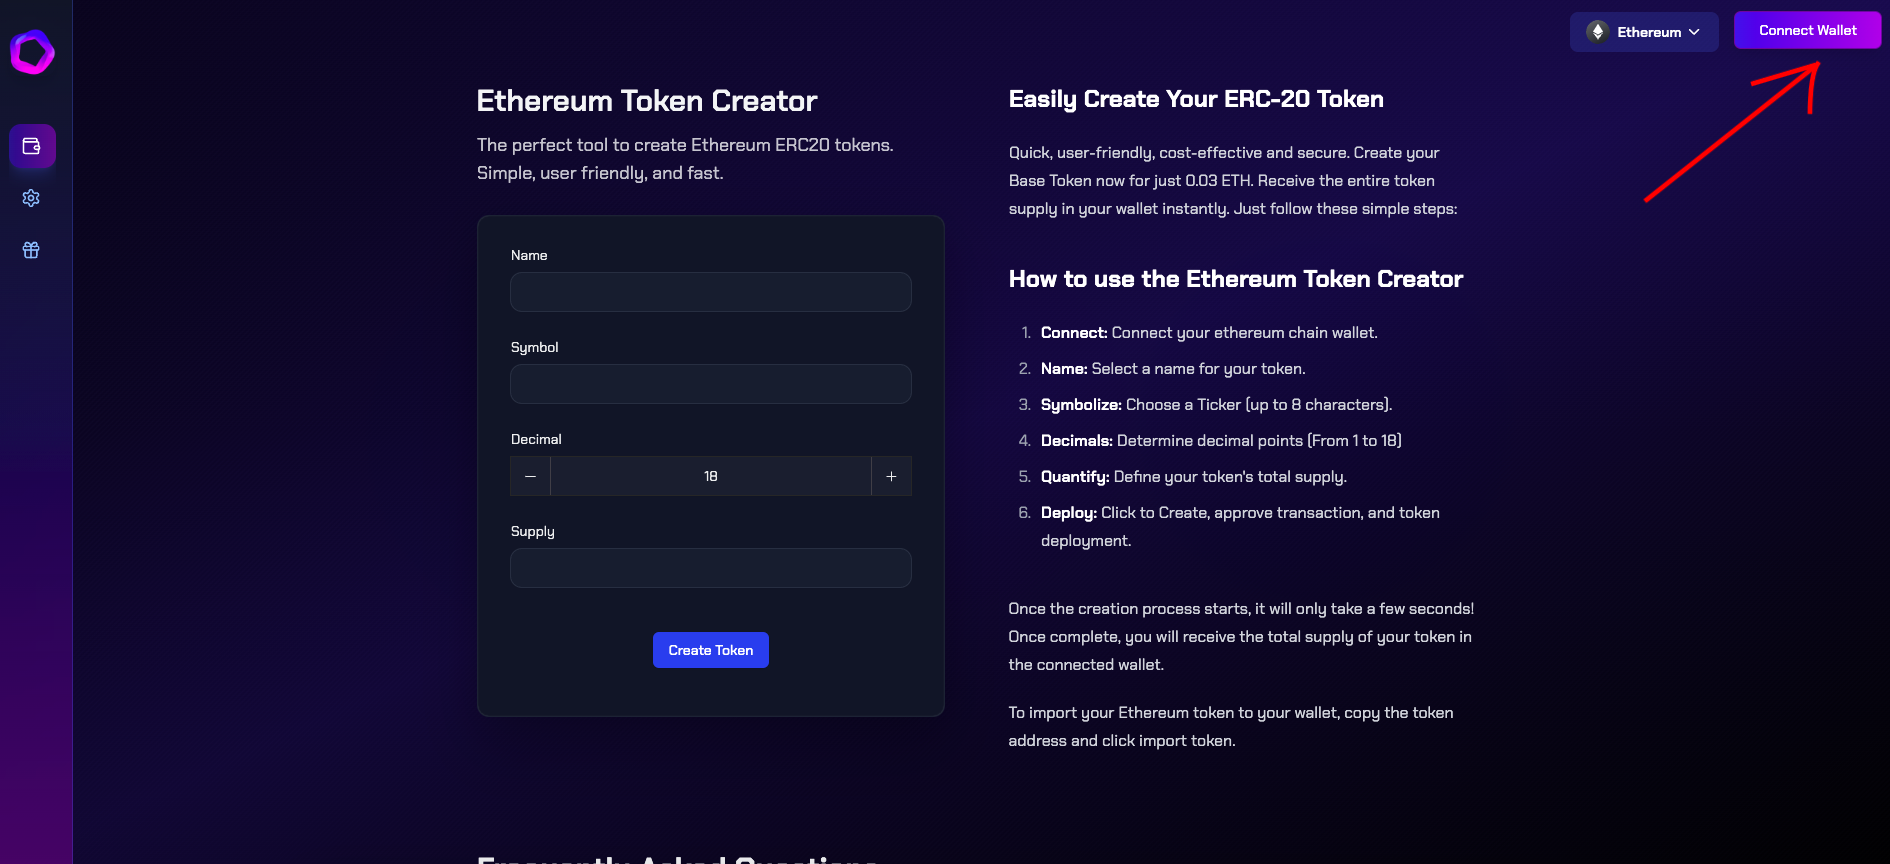
Locate the "Connect Wallet" Button– In the top‑right corner of the page, find the purple "Connect Wallet" button.
Click the "Connect Wallet" Button– Click the button to open the wallet connection prompt.
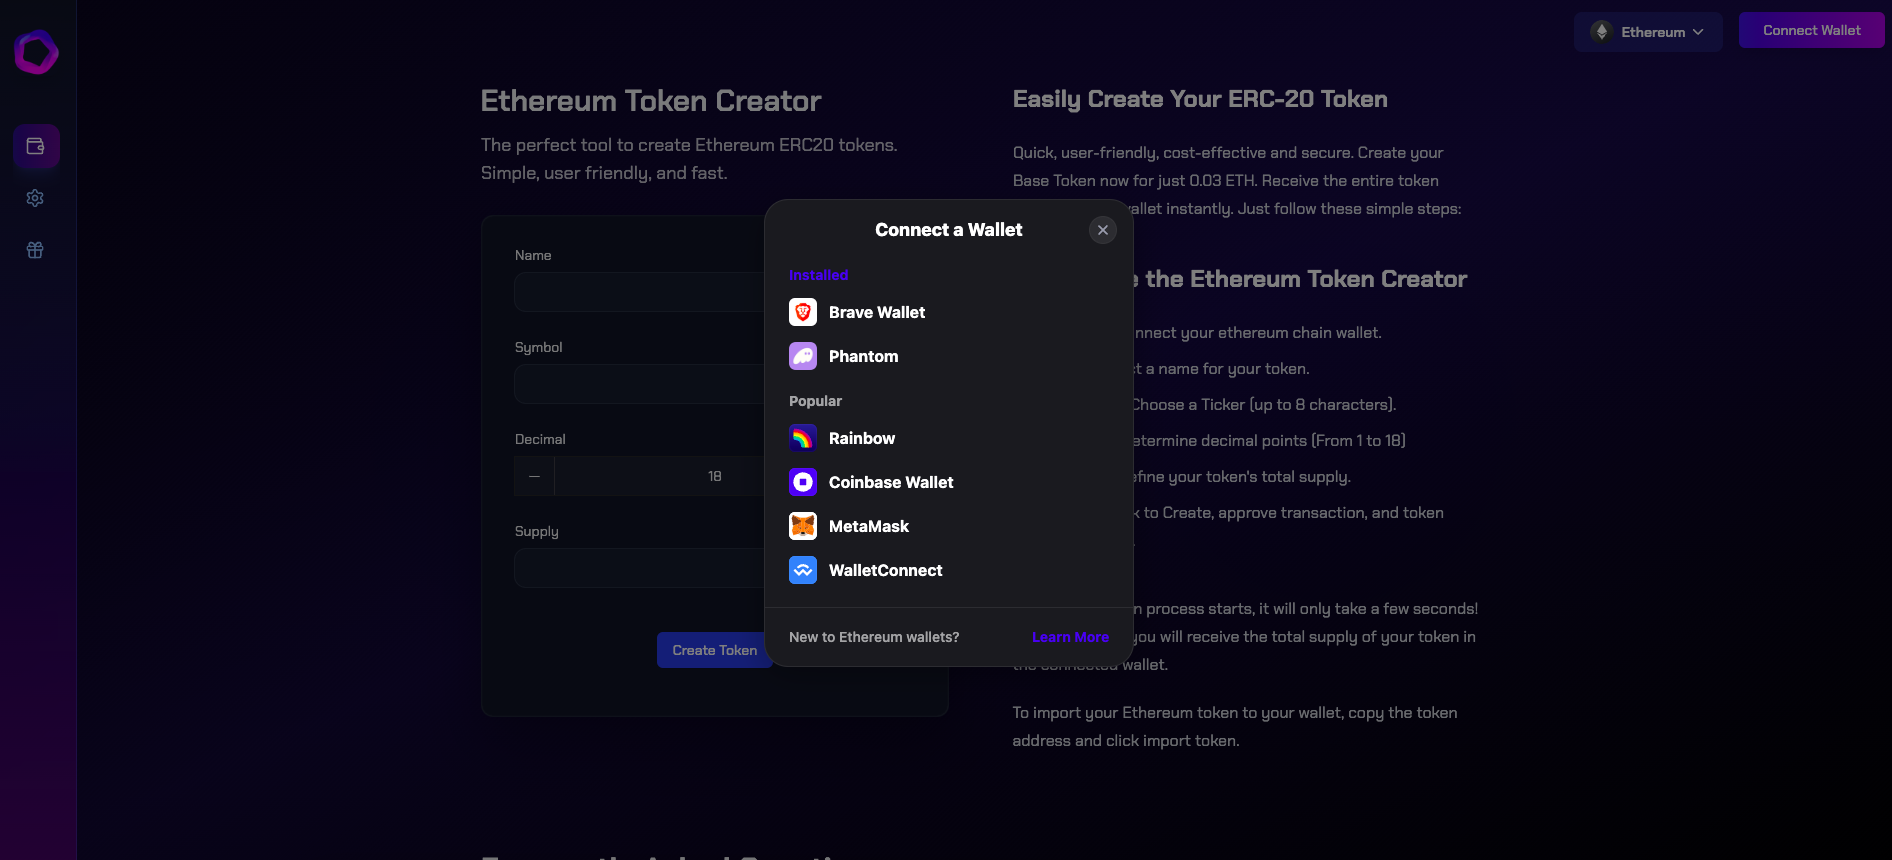
Select Your Wallet– A pop‑up will appear with available wallet options (e.g., MetaMask, WalletConnect, Coinbase Wallet, etc.). Choose the wallet you want to connect.
Approve the Connection Request– If using a browser extension (like MetaMask), a confirmation window will appear. Click "Connect" to grant access to the dApp.
Verify Connection– After connecting, the button will update to show a shortened version of your wallet address (e.g. 0xAbC…123). If successful, you are now connected to the Ethereum network and can proceed with transactions.
Creating Your Token After Connecting Your Wallet
Now that your wallet is successfully connected to the platform, you're ready to create your Ethereum ERC-20 token. Follow these simple steps to mint your eth token:
Configuring Your Token Details
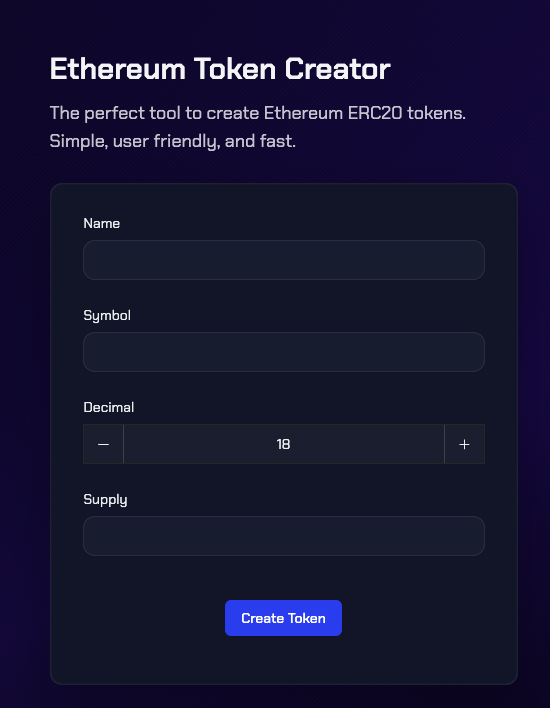
Token Name– Enter your desired token name in the "Name" field. Example: "Global Innovation Token" or "Meta Finance".
Token Symbol– Type your ticker symbol in the "Symbol" field (limit: 8 characters). This will appear on exchanges and wallets. Example: "GIT" or "MTF".
Decimal Places– Use the dropdown menu to select a number between 1‑18. The standard is 18 (recommended for most projects). Select a lower number if you prefer less divisibility.
Total Supply– Enter the maximum number of tokens in the "Supply" field. Use whole numbers. Example: "1000000" for one million tokens.
Deployment– Review all information for accuracy, click the blue "Create Token" button, approve the transaction in your wallet, and pay the required ETH gas fee.
The system will process your request and once deployment is complete, your ERC‑20 token will be live on the Ethereum blockchain with its own unique contract address. To import your Ethereum token to your wallet, copy the token address and click “import token”.
Pro Tip: Keep your token's contract address saved securely—you'll need it for importing to wallets and listing on exchanges. You can now begin distributing, trading, or integrating it into your project's ecosystem, including listing on decentralized exchanges such as Uniswap.
How to Verify Smart Contract Safety
To perform your own basic verification:
Check the contract source code.
After deployment, find your token on Etherscan.
Look for the "Contract" tab and verify the code is published and verified.
Confirm the contract includes proper ownership transfer functions.
How to List Your ERC‑20 Token on Exchanges and Tracking Platforms
After successfully creating your ERC‑20 token on Ethereum, the next crucial step is making it accessible to traders and investors. This guide walks you through listing your token on decentralized exchanges and major tracking platforms to increase visibility and trading volume.
Getting Listed on Uniswap and Other Decentralized Exchanges
Uniswap, as the leading Ethereum DEX, offers a permissionless listing process that any token creator can utilize:
Uniswap Listing Process
Create a Liquidity Pool
Visit Uniswap and connect your wallet.
Select "New Position" or "Add Liquidity".
Choose your token and a base pair (usually ETH or a stablecoin).
Deposit both assets to create the initial liquidity pool.
Approve transactions and confirm pool creation.
Set Initial Token Price
Your initial liquidity ratio determines the starting price.
Consider market conditions when setting this price point.
Provide substantial liquidity to minimize slippage for early traders.
Enable Trading
Once liquidity is added, your token becomes automatically tradable.
Share your token's contract address so users can find and trade it.
Consider setting up a custom Uniswap URL for easier access.
Other popular DEXs to consider:
SushiSwap – similar to Uniswap with additional yield farming.
1inch – aggregates multiple DEXs for optimal trading routes.
Balancer – allows custom pool weights and multi‑token pools.
Curve Finance – specialized for stablecoin trading with low slippage.
CoinMarketCap Listing
CoinMarketCap (CMC) is a premier cryptocurrency tracking platform that adds significant credibility to your token project.
CoinMarketCap Application Requirements
Project Maturity
Active trading on at least one exchange.
Functional website with comprehensive project information.
Working product or clear development roadmap.
Application Process
Submit through CoinMarketCap's listing form.
Provide detailed project information and team background.
Include all social media channels and community links.
Supply accurate contract address and technical documentation.
Post‑Application Steps
Respond promptly to any follow‑up questions from CMC.
Be patient—review times can vary from weeks to months.
Continue building liquidity and community while waiting.
CoinGecko Listing
CoinGecko offers another valuable platform for token visibility and tracking.
CoinGecko Application Strategy
Meet prerequisites
Active trading on at least one exchange (DEX or CEX)
Working website with clear tokenomics information
Established community channels (Telegram, Discord, Twitter)
Submission Process
Apply through CoinGecko's listing form
Provide comprehensive token and project details
Include all trading pairs and liquidity information
Submit blockchain explorer links and contract verification evidence
Enhancing Approval Chances
Ensure transparency in team information and token distribution
Maintain active GitHub repositories if applicable
Demonstrate community engagement and organic growth
Provide detailed use cases and token utility documentation
Maximizing Visibility After Listing
Optimize Liquidity Management
Monitor and maintain healthy liquidity pools.
Consider liquidity mining incentives for pool participation.
Create multiple trading pairs to increase accessibility.
Implement Trading Incentives
Launch trading competitions or rewards.
Consider transaction fee sharing mechanisms.
Explore yield farming opportunities for token holders.
Build Market Presence
Publish regular project updates and roadmap progress.
Engage with crypto communities and opinion leaders.
Form strategic partnerships with other blockchain projects.
Understanding ERC‑20 Token Approvals: A Comprehensive Guide
What can you do with ERC‑20 Tokens?
ERC‑20 tokens are smart contracts that operate on Ethereum‑compatible blockchains like Ethereum, Polygon, or Binance Smart Chain. Rather than being a specific implementation, ERC‑20 is an interface standard that requires tokens to include certain functions and features to ensure compatibility across the ecosystem.
The standard defines common functions such as:
transfer(address recipient, uint256 amount)approve(address spender, uint256 amount)transferFrom(address sender, address recipient, uint256 amount)
While these functions exist in all ERC‑20 tokens, their exact behavior can vary based on the token's implementation. Most developers use battle‑tested libraries like OpenZeppelin for their base implementation, occasionally adding custom functionality like transaction fees, reflection mechanisms, or governance features.
How Token Approvals Work
When you interact with decentralized applications (dApps), you rarely send tokens directly to smart contracts. Instead, the process typically involves two separate steps:
Granting Approval– You authorize a smart contract to access a specific token from your wallet up to a certain amount.
Contract Execution– In a subsequent transaction, the smart contract “pulls” tokens from your wallet when needed.
Understanding Approval Risks
Token approvals create potential security vulnerabilities:
Persistence:Approvals remain active until explicitly revoked or fully spent.
Independent Access:The approved contract can access your tokens even if you're offline.
Contract Risks:If an approved contract is compromised or malicious, your tokens are at risk.
Unlimited Approvals:Unlimited approvals for convenience create significant exposure.
Security Best Practices
Managing Approval Amounts
Limit approval amounts—approve only what you need.
Use decimal notation correctly (most tokens use 18 decimals).
Edit the approval amount in wallet before confirming.
Smart Compartmentalization
Create separate wallets for different activities or risk levels.
For new or unaudited protocols, use a fresh wallet (transaction‑specific wallets).
Keep tokens in deployed positions rather than idle in your wallet.
Regular Maintenance
Revoke unused approvals (e.g., Etherscan approval page).
Monitor security alerts about protocol hacks or exploits.
Periodically review all active approvals across your addresses.
Understanding how ERC‑20 approvals work is essential for maintaining security in DeFi. While unlimited approvals offer convenience, they create significant security exposure. By implementing these best practices, you can significantly reduce your risk while still enjoying the benefits of decentralized finance.
